
Yes, a blender can crush ice, but only if it is a full-size model with a stainless steel blade assembly and a manual that approves ice. Stick blenders, food processors and some personal or glass-jar blenders are poor choices. Higher wattage helps, though blade design, jar shape and technique matter just as much.
How many watts does a blender need to crush ice?
As a rule of thumb, about 400 W is the practical minimum for crushing small amounts of ice in a full-size blender, and 1,000 W or more makes the job faster and smoother. These are rough tiers, not a standard, and they vary by model. The ice rating in your manual or on the box is what counts.
Wattage is only input power. Three other things decide whether ice breaks cleanly:
- Motor torque and build: a motor that holds its speed under load keeps the blades turning when cubes jam. Cheap motors slow down and stall.
- Blade design: thick stainless steel blades, often stacked at several heights, break cubes more reliably than a single thin blade.
- Jar shape and material: a tall jar with a narrow base pulls cubes down onto the blades. Thin or flat-bottomed jars let ice sit on top and spin.
| Power tier (estimate) | What to expect with ice |
|---|---|
| Under 400 W | Not suited to ice unless the manual says so |
| 400-999 W | Small batches of small cubes in short pulses; slower and coarser results |
| 1,000 W and up | Faster crushing, bigger batches, finer texture |
These tiers are an estimate, not published specs. A 600 W blender with a strong blade and a tall jar can beat a 1,000 W model with a flat blade, so trust the manual’s ice claim before the wattage number.
Which blenders can crush ice and which can’t
Blender type is the fastest way to answer the question. Ice ratings still vary by brand and model, so treat this table as a starting point and confirm in your manual.
| Type | Crushes ice? | Where it falls short |
|---|---|---|
| High-power full-size (about 1,000 W+) | Yes, usually the best option | Loud; a few models still limit ice amounts |
| Standard full-size (about 400-999 W) | Usually, in small batches | Slower, coarser, and some models struggle with whole cubes |
| Personal or single-serve cup | Only if the manual says so | Small cup, fast heat buildup, cubes can wedge |
| Portable or rechargeable cup | Small ice at best, if the brand allows it | Low power; check the maker’s ice guidance |
| Glass jar | Depends on the model | Heavy; some makers advise against hard ice |
| Immersion (stick) blender | Usually no | Ice can catch behind the blade guard |
| Food processor | No | Can damage blades and crack the plastic bowl |
Independent lab testing has shown that some full-size blenders fail a crushed-ice test, and that some hand blenders let ice get caught behind the blades (Rtings). Wattage and price did not guarantee a pass.
Choose a personal blender only if it is ice-rated and you will blend one drink at a time. Our nutribullet Pro+ review covers a higher-wattage personal-style option. Stick with a hand blender for soups and sauces, not ice; the KitchenAid KHBV53 hand blender review shows what that tool is built for.
How to crush ice in a blender, step by step
- Check the manual first. Look for the ice rating, the max fill line and whether liquid is required.
- Let the cubes sit about 5 minutes. A thin layer of melt separates frozen-together cubes and helps the blades grip. Break up any clumps by hand.
- Add liquid, then ice. Use the amounts in the table below and stay under the max fill line.
- Lock the lid, and keep the cap or tamper secured. Keep hands and utensils out of the jar while it runs.
- Pulse, don’t hold. In a full-size jar, use 1-2 second pulses, about 10-15 times, so ice falls back onto the blades between bursts. In a personal cup, use a few seconds at a time and shake the cup between bursts.
- Stop when the texture looks right. If the motor sounds like it is laboring or the base feels hot, stop and let it cool.
| Jar size | Ice (small cubes) | Liquid | Pulses |
|---|---|---|---|
| 20-24 oz personal cup (ice-rated only) | Up to 1 cup | 1/4 cup | 3-5 short bursts, shaking between |
| 40-48 oz jar | 2 cups | 1/2 cup | 10-15 pulses |
| 64 oz jar | 3 cups | 3/4 cup | 10-15 pulses |
These are rule-of-thumb starting points (about 1/4 cup liquid per cup of ice), not manufacturer specs. If your manual lists lower limits, use those.
Hot liquids: do not blend ice into hot liquid or blend hot liquid in a sealed jar. Steam can build pressure and push the lid off. Follow your manual’s hot-blending instructions, and let drinks cool first.
Can a blender crush ice without liquid?
Sometimes. Manufacturers disagree. KitchenAid’s UK site says no liquid is needed for its ice-crushing function, while at least one other brand’s manual says not to crush ice without liquid. Follow your own manual.
Use this decision rule:
- Manual says liquid is required: add it. Plain water works for crushed ice.
- Manual says no liquid is needed: crush about 1 cup at a time in short pulses.
- Manual is silent or lost: add liquid at about 1/4 cup per cup of ice.
Dry crushing puts more load on the motor, and ice can pack under the blades. For snow-like texture, start with cubes that have sat for about 5 minutes, crush in small batches, then pour the slush through a fine mesh strainer to drain the water.
Never blend dry ice. Dry ice is solid carbon dioxide, not frozen water. It can build pressure under a lid, and it is not a substitute for regular ice.
Signs your blender is struggling, and what to do
Ice alone rarely dulls blender blades, which are fairly blunt by design. The usual damage is strain on the motor, the drive coupling under the jar and the jar itself. Watch for these signs:
- A burning smell or a base that is hot to the touch
- The motor pitch dropping or the blades slowing down
- Cube edges rounding off without actually breaking
- Ice spinning in a ring above the blades
- Cloudy scratches or cracks in the jar
If you see any of these, switch the blender off and let it cool. Check the manual for rest times between batches, because they vary by model. Next time use smaller cubes, less ice or a bit more liquid.
If ice jams the blades: turn the blender off and unplug it before you touch anything. Remove the jar, loosen the ice with a spoon handle, and handle the blades by the edges of the assembly. Never reach into the jar while it is plugged in.
Alternatives: crush ice by hand in a canvas bag with a mallet, or use a manual crusher. If you crush ice often, a dedicated machine is easier on your blender. See our best ice crusher machine picks.
What to buy if your blender can’t handle ice
Look for the words “ice crushing” or an ice-specific instruction in the manual, not just a high wattage number. Then match the jar to how you use it: a 64 oz pitcher for batches of drinks, a smaller cup for single servings.
For pitcher-style crushing, our Ninja Professional Blender BL610 review covers a model marketed around ice crushing. To compare more options by power, jar size and price tier, start with our best blenders roundup.
A quick pre-purchase checklist:
- The manual or box mentions ice crushing
- The blades are stainless steel
- The jar is rated for the amounts you plan to blend
- The warranty does not exclude ice or hard foods
Our Top Picks
Ready to shop? These are the top-rated options from our hands-on roundup, Best Blender to Puree Food for Elderly of 2026.
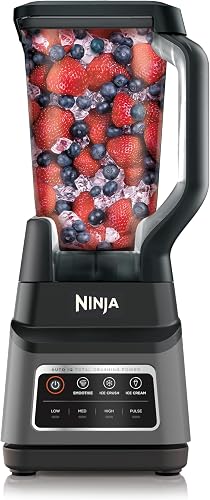
Ninja Professional Plus Blender BN701 1400W Auto-iQ 72oz Pitcher - Smoothies, Frozen Drinks, Ice Cream

Ninja Professional Blender BL610 1000W 72oz Pitcher Total Crushing Technology

Ninja Fit QB3001SS Personal Blender, 700W, 16oz Cups
As an Amazon Associate we earn from qualifying purchases. Product prices and availability are accurate as of the date/time indicated.
Frequently Asked Questions
Can I crush ice in a glass jar blender?
Only if the manual approves ice. Some glass jars are fine for crushing, while others warn against hard or very cold contents. Glass is heavy and can crack from impact or sudden temperature changes, so check the manual before you try.
Can I blend frozen fruit the same way as ice?
Often, but not always. Frozen fruit is usually softer than ice cubes but can still jam blades. Add liquid, use smaller pieces and pulse. Some personal blenders handle fruit but not ice, so check your manual for both.
Can I crush ice ahead of time and store it?
Crushed ice clumps and refreezes into a block within hours in the freezer, so it is best made right before serving. If you must store it, spread it on a tray to freeze first, then move it to a sealed bag.
How long should I rest the blender between ice batches?
It varies by model, so follow the manual’s rest time. As a general rule, stop when the base feels hot or you smell something burning, and wait until it has cooled before the next batch.
{“@context”: “https://schema.org”, “@type”: “FAQPage”, “mainEntity”: [{“@type”: “Question”, “name”: “Can I crush ice in a glass jar blender?”, “acceptedAnswer”: {“@type”: “Answer”, “text”: “Only if the manual approves ice. Some glass jars are fine for crushing, while others warn against hard or very cold contents. Glass is heavy and can crack from impact or sudden temperature changes, so check the manual before you try.”}}, {“@type”: “Question”, “name”: “Can I blend frozen fruit the same way as ice?”, “acceptedAnswer”: {“@type”: “Answer”, “text”: “Often, but not always. Frozen fruit is usually softer than ice cubes but can still jam blades. Add liquid, use smaller pieces and pulse. Some personal blenders handle fruit but not ice, so check your manual for both.”}}, {“@type”: “Question”, “name”: “Can I crush ice ahead of time and store it?”, “acceptedAnswer”: {“@type”: “Answer”, “text”: “Crushed ice clumps and refreezes into a block within hours in the freezer, so it is best made right before serving. If you must store it, spread it on a tray to freeze first, then move it to a sealed bag.”}}, {“@type”: “Question”, “name”: “How long should I rest the blender between ice batches?”, “acceptedAnswer”: {“@type”: “Answer”, “text”: “It varies by model, so follow the manual’s rest time. As a general rule, stop when the base feels hot or you smell something burning, and wait until it has cooled before the next batch.”}}]}